Friday, October 21, 2011

An Easy Way To Do Biscuits With Propane


How To Cook Biscuits On The Volcano Using Propane 

We decided to see what was the best way to cook biscuits on the Volcano in a regular pan. After a quick run to Wally World to get a suitable pan.. We got out our trusty Volcano, set it up for propane, lit the flame, turned it as low as we could, put the biscuits in a pan.. Covered them with the lid.. in less than 3 minutes FAIL. The burned smell permeated the entire warehouse (we were outside at the time)

Hmm.. Round Two.. Same set up.. flame as low as we could get it.. Made sure the hole was wide open in the top of the Lid, Temperature climbed to 250.. 260.. stayed there.. and: Fail. Burned them again. This did not bode well. 

Round 3: Same setup, used two diffuser plates to cut down the amount of air (and thus heat from the burner) turned the top diffuser plate to cover most of the open air. Fail. they burned too. 

Round 4. Same setup, made sure the two diffuser plates covered as much air as they could.. Fail. 

We scratched our heads.. What could we do? We thought of a variety of things.. but we wanted to start with the simplest. Being both geniuses and cheap... We covered the diffuser plate with aluminum foil. (this pic was taken after they were done)
We also got a cheap meat thermometer and put it in the hole in the lid so that we could keep track of the temperature.  
During the cook, the temperature got up to 400 degrees, we adjusted the flame and kept the temp between 325 and 350 for 15-17 minutes. (note: we took the lid off twice, your cook time could be faster if you do not)

This is what the top side looked like:
And this is what the bottom looked like:
These were the exact right consistency in the middle. Next time, Ill spray more butter on the top to make them even more brown. 


Round five was a raging success.. So, we suggest that in order to get the best heat for baking when using propane and the lid, we suggest aluminum foil on the diffuser plate.


Mark Infanger Utah

Sunday, October 16, 2011

A Lovely Day In the Canyon

Here in Utah, it is a pretty safe bet that October means "So Long Summer! Hello snow, ice, bad traffic and salt on my car. Ughh!
Not wanting to think about that prospect, my wife and I decided that a trip up the canyon was in order. 

The Premise: How long would it take to cook a great steak with 15 briquettes and no lid. (This might have been about the lid had I remembered to bring it) 

We decided on a very simple menu:

Steaks
Potatoes
Fruit Salad
Potato Chips (Insisted upon at the last moment while we were at the Texaco)
Crystal lite (I can't drink soda until the end of the year, Im betting with someone) 

My personal Volcano lives in my jeep. I don't often cook with Propane and left the burner home. In that space, I keep a baggie with about 15 Match Light Briquettes,(be sure to get them mostly white or youll get lighter fluid flavor)  matches, couple of pair of surgical gloves,  and a few other things. This way, Find Coolers, fill with stuff, leave. Way less complicated
I dumped out all of the briquettes on top of the diffuser plate. This is the best way to grill with the volcano. I made the lovely mound you see.. 


And with one match, got the show on the road.
I arranged the potatoes around the edge of the diffuser plate, made sure they weren't touching the coals, and proceeded to go. I gave the potatoes a head start of about 15 minutes.
I added the steaks, salt and pepper. I cooked 9 minutes on one side, 9 on the other and about 5 to finish. I had the draft ring 100% open all the time. This made the steaks medium.

We decided that to pass the time we would watch a movie on my iPad. Not that great. The Ipad screen washed out, even in the shade, and with the river nearby, hearing was impossible. Happily it was  a foreign film.. so it was sub-titled. 
I smashed the potato with a plastic fork.. It was pretty tender and very delicious... I would rate it excellent!


Friday, August 19, 2011

How to Cook for 60 people with 2 Volcanos and Milk Cans

Milk Can Cooking on the Volcano
If I've heard it once.. Ive heard it 50,000 times. The Volcano is too small, unless you use a Dutch Oven and stack them, to cook for a big group. I say: Fiddlesticks.
And, tonight, (with help from my brother) I proved the naysayers wrong. :) 

Two 10 Gallon Milk cans
on two Volcano
Collapsibles.
Milk Can Cooking -
2 Volcano Collapsible Propanes
Two 10 gallon stainless steel milk cans.
Two 20lb Propane Bottles.
1 Pair of Heavy Duty Gloves
1 Pair Of Scissors
2 LARGE packages of Cheese Cloth
Long Tongs
A folding Colander That will fit through the throat of the milk can and expand to cover the bottom. Bed bath and beyond carries them. The ones at Walmart are too small.
Oven Mitts or Hot Pads

The Ingredients -
20 lbs of ham, (Water Added like Farmland) sliced into 1/3 lb slices. (I got the Deli at Walmart to do this for me.)
14 Lbs of Onions. (I used  a combination of Walla Walla and Candy, but you can use any white onion)
6 Lbs of Kielbasa
60 Fist Sized (Think Petite Womans Fist if you want them to cook more quickly)
4 Dozen ears of Corn.
Spices that you like. I used Trader Joe's Spices of the World 21 Seasoning Salute.

The Prep. This is where all the hard work comes in.
If you didn't have the Deli Do it, slice the Ham into 1/3 Lb slices. On a 5lb Ham, this works out to 15 slices per ham or a total of 60 slices. Put 30 Slices in one 2 gallon zip lock bag and the rest in another.
Slice the onions into at least quarters, if they are big, slice them into 1/8ths Divide the onions into two equally full big zip lock bags. (I used 2 gallon size)
Slice the Kielbasa ( I bought six 1lb Pkgs. so it was easy to divide them) into about 1/2 wide slices. Put 3lbs in one bag and 3 in the other.
Shuck the corn and break it in 1/2. Divide the corn 48 pieces for each can. 

Getting the Food into the Milk Cans
Put yourVolcanos on the ground. You will hate lifting full 10 gallon cans from height.
Get your Volcanos Started.
Put the Milk cans on the Volcanos
Put the Colanders in the bottom
Pour in about 16 oz. of water into the bottom of the milk can.

Cut the cheese cloth into about 3 foot long strips. The objective is to make a very loose bag. You have to bring the food out the same hole you put it down in. Put the potatoes on the cheese cloth and tie it, diaper style, so that you form a bag. (It should fit VERY loose) Put the potatoes down into the bottom of the Milk can. Repeat this for the 2nd.
Take your corn and place it on top of the Potatoes. There isn't any particular order. Repeat for the 2nd can.
Using the Cheese Cloth again, mix 1/2 of the ham and 1/2 of the kielbasa on the cheese cloth. Put your spice on the mix and then tie that into a bag, also and slip it into the milk can. Repeat for the 2nd can.
Using your cheese cloth, do the same thing for the onions. Don't add more spice.

Put the top on the milk can (We had to jiggle the cans a little bit to get it all to fit.) Wait.Pretty soon you will see steam coming out of  the top of the milk can. From that point it takes about 1 hour to cook. If the milk cans STOP steaming.. add more water if you dont think they are done or turn it off.

When the hour is up, turn the heat down on one of the milk cans, and turn the other one off. Take the lid off the one that you turned off. Put on your gloves. (Save you from Steam burns) And grab your tongs. Grab the cheese cloth in a thick spot, and pull out the onions. (Anything in a bag can take some finagaling to get out and/ or strong pulling) Put them in your serving platter (Sweet onions are pretty good this way) Repeat for the Ham/Kielbasa mix. With your tongs (Now you know why you wanted long) take out the corn and after that, take out the potatoes..
Let the people start to eat.. When you start to get low on food.. Repeat for the 2nd can... That way the food will stay hot.. and delicious.
Remember this is STEAMED food. That means at 5000 ft of elevation it comes out of the can at about 204 degrees. It cools of quickly. Don't lolligag in serving it.

Taste the corn.. All the flavor from the onions and ham and kielbasa should have filtered down on that and the potatoes. If the corn is delicious w/o any butter ... You did it right.. Likewise the potatoes.


Layout your cheese cloth and get ready to build a bag


Tie the cheese cloth into a bag. Sort of diaper style.
You have to feed them down into the milk can. They come out the same way. However, they were HOT and I was busy, so  I didnt take any pictures of that.
Ham and Kielbasa mixed. If you DONT use the water added ham, it will be really dry. Think shoe leather.
My Brother was worried that we wouldn't get enough heat with the Volcano. He was W R O N G.
You can see the steam if you look close
Looks delicious.. And it was..
Like Hungry Locusts, they came in swarms and it soon vanished.

mark infanger utah

Friday, August 12, 2011

A Recipe That Looked Tasty


Multi Pepper Flat Iron Steaks

I found (read stole) this great recipe for Flat Iron Steaks

Ingredients

    1 tablespoon smoked paprika
    2 teaspoons salt
    1 teaspoon brown sugar
    2 teaspoons chili powder
    1 teaspoon chipotle chile powder
    1/2 teaspoon ground black pepper
    1/2 teaspoon garlic powder
    1/2 teaspoon onion powder
    1/2 teaspoon ground cumin
    2 pounds flat iron steaks

Directions

    Stir together the paprika, salt, sugar, chili powder, chipotle powder, black pepper, garlic powder, onion powder, and cumin in a small bowl until blended. Rub the seasoning mix all over the flat iron steaks, then wrap them tightly with plastic wrap. Marinate in the refrigerator 2 to 8 hours (the longer the better).
    Preheat an outdoor grill for medium-high heat, and lightly oil grate.
    Cook the steaks on the preheated grill until cooked to your desired degree of doneness, about 4 minutes per side for medium. Allow the steaks to rest for 5 minutes in a warm location before slicing.


Monday, August 8, 2011

Dutch Oven Potatoes - WOW!

I was invited to a family reunion this past weekend. I usually dread family reunions. Outside of my own cousins and Uncles and Aunts, I dont know any of the rest of the crew.
Add on top of that that it was my mothers family and the paternal family of one of my Aunts, I thought there would be few people, outside those I mentioned, that I knew. 

The first nights activities started around 7pm and we didnt get there until about 8:30. we got leftovers. Mostly cookies, cake and junk. None of which looked too appealing to me. 

Someone said to me: Did you try the Dutch Oven Potatoes? I thought, Ho-hum BORING. However, when I tasted said food, I was delighted.

After talking to the Chef, Don Bird from Bear Lake, and a little cajoling, he gave me the basic recipe. I thought I would share it with you. 

In a 12" deep Dutch oven
Slice 20 lbs of potatoes. He used Idaho Bakers, I would try reds, also. He also took the skin off. When asked why, he said the spuds were about a year old, but normally he would not do that. 
1/2 lb Bacon
1 Big Yellow Onion
Carrots and Veggies to taste (Zucchini works well, but add it way late in the cook or it will turn to mush)
1 can of pickled Jalapenos (Fresh would work, but they would be more spicy)
1 Can of 7up Or Beer.
1/2 Cup Oil
1 Cube of butter. (NOT margarine)


Brown onions and bacon till onions carmelize.
Add the butter and melt it.
Add the oil - Use your discretion on the amount of oil.
Add the Potatoes
Add the Jalapenos (optional)
Add the Carrots
Salt and Pepper to Taste
Stir so that it is all well mixed together
Cook  with lid on DO for 30 minutes
Add 7up or beer
If you are using Zucchini this is about the time to add it in.
Also about the right time to put cheese on the top.
Cook about 15 more minutes and you are ready to go.
You can add cheese on top - Cheddar or Colby is the most common, but I was told a good pepper jack would work well, also. 


written by Mark Infanger Utah


Wednesday, July 20, 2011

The Volcano Jr

We have talked a little bit about bringing the Volcano Jr. back. For the most part the responses have been positive.

We feel that it would be MOST useful for singles who want something that does not require a specific fuel. IE it could burn charcoal or wood, instead of hard to find butane cylinders or white gas or otherwise. Those things seem to be the first thing to disappear when disaster strikes. 

The whole setup (we would probably make a Dutch Oven to specifically fit this) would weigh less than 20lbs, fit into a case. We would probably also make a Volcano Lid for it, also.

The Volcano Jr will fit either an 6" Dutch Oven or a 8" Dutch Oven as seen below.

The Lodge 6" Dutch Oven From the Lodge Site

Designed to meet consumer demands for smaller renditions of family favorites, desserts, sauces, or specialized recipes, the new 1-quart Lodge Camp Dutch Oven joins the list of eight Camp Ovens produced in South Pittsburg, TN.

Item No.    Description   

L6CO3    Lodge Logic 1 qt. Camp Oven
6-5/8" dia, 3" depth   


Or the 8 inch. Info is also from the Lodge Site
The Lodge portable “camp stove” is the pot that does it all. The flanged lid holds hot coals and inverts for use as a griddle. The integral legs allow the oven to sit perfectly over hot coals.

Includes Camp Dutch Oven Cooking 101 cookbook.
SKU    Description   


L8CO3 2 qt., 8" dia., Depth: 3"


And in case any of you are wondering, the Volcano Jr. Belongs to Mark Infanger Utah, and is not for sale.

Monday, June 13, 2011

A Great Recipe From the Cookbook

We decided that once a week we would pull a recipe from the Cook Book and give it a whirl.


Babecued Hamburgers with Onion Rings
2lbs lean ground beef
2 tsps. BBQ sauce
1 tsp Dijon Mustard
Cheese slices -optional.
1 egg
1/4 cup corn meal.
1 Large onion (one slice per burger)


We modified this recipe so that it could be use with the middle grill and the lid.
Put 19 Kingsford Charcoal briquettes on the bottom grill of the Volcano. Light them and wait till they are completely white and all the lighter fluid smell is gone. This will take about 15 minutes or so.


Mix BBQ sauce, mustard, egg and cormeal together and add to ground beef. We found it handy to have some surgical glove so that you could knead the ingredients together for better consistency. Make into patties about 1/2 inch thick and 3.5 inches in diameter. Make them all the same size they will all fit on the Middle Grill. (If they are all 3.5 inches, you can get 7 on the grill)


Open the bottom vent to 100%. Place all the burgers on the middle grill. and cover with the lid. Let cook for about 10 min. Turn the burgers and continue cooking. Cook times will vary, but we cooked ours an additional 15 min (with the lid on) and then place the onion and cheese on top.


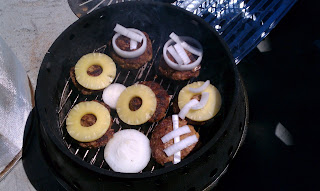
Since we still had a completely unoccupied top grill we thought.. What can we do? We decided that we could use the Volcano as a double decker cooker and grilled Avocados (Be sure to put some spices on them before you grill them or you will just have hot Avocado.. (not that tasty)


The avocado and pineapple slices all ready for the grill. The limes were to spice up the burgers. I add two different rubs to the avocados. One was a lime cilantro and the other was a garlic herb. They turned out not too bad.


Here is what the finished product looked like.. All the burgers disappeared in about 30 seconds.. They were very tasty.

Monday, May 9, 2011

New Product Coming Soon!!

Summer time brings with it thoughts of the outdoors.. BBQ and, of course, outdoor cooking. We are going to introduce, in the very near future, a line of flexible skewers. (Pictures later)
The skewers are made from stainless steel and can be flexed to fit around the top of the Volcano, giving you ample room for 3 or 4 flexible skewers.. A LOT of food, basically.
Keep your eyes here.. We've tested them till the cows come home and think you will agree that they belong in your cooking set up.. The perfect complement to your Volcano Outdoor Portable Grill.
Keep your eyes peeled.. I'll post news here as it develops..
We will also be introducing 2 OTHER products this year.. However, I have to keep those under wraps for now.. Stay tuned! 
Flexible Skewers Make Using ALL the space on your Volcano Easier.

Friday, April 8, 2011

I hope that spring decides to show up..

I don't know about where you live, but here in Utah, it seems like Spring took a vacation and we skipped right back into late fall. Since October of 2010, we have had exactly 1 day over 70 degrees. Uggh.
As most of you know.. The Volcano is in short supply. (We anticipate that they will be back in stock in May) To that end, if you would like to be one of the FIRST to receive one when they come in.. Call us at 866.320.2005 and ORDER one for $149.95. This price includes shipping to ANY of the 48 contiguous states. Please note FREE freight ONLY applies to back ordered items. Call if you have questions.
The big concern here in Utah is that it will warm up too fast, the snow pack will melt too quickly and we will get flooding. Wise council would be to pack your charcoal briquettes in something waterproof. I suggest that, for your 72 hour kit, you keep it in a Dry Sack (like they use on River Rafting expeditions). Waxed matches. The Boy Scouts were right.. Being prepared is a pretty good idea.

Thursday, March 17, 2011

ISE Sportsmans Show SLC -2011


The ISE Show in Salt Lake is always fun and full of surprises. If you get a chance, it is being held at the Southtowne center in Sandy.. Thursday the 17 of March 2011 - Sunday March 20th, 2011.

There were a TON of Lodges and places to go hunt and fish.. I saw a Zimbabwe Safari even!

The IDOS World Championship Cook off unfolded right in front of us.. And the points spread was tight..  Worth checking out..

We debuted our Ashbash (www.volcanogrills.com) outdoor Fire pit/Grill at this show. Every small child wanted to touch the fake flame the we used.. As the show drew to a close a couple of families came by and the kids were having a terrific time.. I asked for, and got, permission to take this picture... 


I will also have a few of the Original Volcano to sell and, quite by mistake, I have legs for the Original at the show.. $30.00 for the set.. and we will pay the tax. ONLY available at the show.

Monday, March 14, 2011

Great Ribs with the Volcano AND the Volcano Lid

For a long time, we have wondered what was the best way to do ribs on the Volcano. Ribs, IMHO should not be boiled, dry out too much if you grill them and aren't that tasty raw. 

Based on a recipe that I found here 
http://www.amazingribs.com/recipes/porknography/best_BBQ_ribs_ever.html
(It really is a rib recipe, I promise.. and it is DELICIOUS!) 

With ribs the key is LOW and SLOW.. 225 is about the perfect temp.. We used 8 briquettes, the Volcano Collapsible and the Volcano Lid.

Because good ribs require some water while cooking.. Brandon had our welding shop make a custom box for the volcano.


Notice the arrangement of the coals.. and the hickory chips.


The ring you see around the bottom of the Lid shows how effective it is.. I have no idea if it is washable..


One of the hardest things to do is to get the correct temperature. The solution was pretty easy.. A common food thermometer.. for less than $2.00 at Walmart .. let us know the right temp., Temp was easily controlled with the vent system.. (This was the start of the cook)


After letting them cook for about 4 hours (Swapping in new coals just once.. and that towards the end) The ribs were looking pretty good.


Then we SLATHERED (on both sides) our favorite BBQ Sauce.... (read the cheapest stuff we could find at Maceys) and let it cook for about another hour or so.


I didn't get a chance to take a picture of the ribs when they were cut.. (it was an afterthought, sorry) but the smoke ring was well developed, they were tender but not mushy..

The only sad part is that there were not enough to feed all of the  people who work here..

If you don't have  a Volcano Lid.. they are on sale this month with a 15% additional discount.... (www.volcanogrills.com)

We want to figure out a top for the Ashbash... (So we can feed the masses) I'll keep you posted on developments.

Friday, February 25, 2011

Volcano Grills Collapsible - Easy Fajitas. Cmon SUMMER!

Where I live, Utah County, Utah, Winter came back with a vengeance today.  Snow, snow and more snow. Yuk. Yuk. Yuk.

I wanted to try something that would cheer me up and remind me of summer. For me, summer foods are: sea food, BBQ and sunshine. 
Since it was too snowy to BBQ and sunshine seemed like it was only a dream, I wanted sea food.. I also wanted easy.
I tried this. 

Ingredients
2 Tablespoons olive oil (Any oil will do, well maybe not 10-30, if you don't like olive oil.) 
1 Green Bell Pepper, sliced
1 Red Bell Pepper, sliced
1 pound medium shrimp - peeled and de-veined
1 red onion sliced halved and then sliced 
1 Package Taco Seasoning mix
6 (10 inch) flour Tortillas
Optional: Jalapeno Peppers


Directions
1. Use 12-13 briquettes in your Volcano, Open the Vent Ring ALL the way. Let the Briquettes get a nice white color before starting.
2. In your Dutch Oven Heat 1 Tablespoon of oil. Add the Bell Peppers and onion. 
3. Cook, stirring frequently until the peppers are hot, but still somewhat crisp, (maybe 5 min) (You will want   to put the lid of your Dutch Oven on.. You will need it hot for the tortillas) Remove this mix and put aside.
4. Put the 2nd tablespoon of oil into your Dutch Oven and add the Shrimp. Cook, stirring once in a while, until pink and opaque. Close the Vent Ring ALL THE WAY and put the peppers and onions back into the skillet. Stir in the Taco Seasoning. Add a little bit of water if needed so that everything evenly coated with the Taco Seasoning. Simmer until peppers are heated.
5. Turn the lid of your Dutch Oven over. Use this to warm your tortillas. 

Anyway.. It made me think of summer.. and how much I would like to be eating these on a beach somewhere close to the equator..

Friday, February 11, 2011

My new & improved Spaghetti Sauce Recipe

Since I am still home with a mending wing.... I decided to experiment.. This being Valentines weekend...Something not too hard, that my wife would love..Had to be tasty.. She Loves Italian Food.. Spaghetti, especially.The idea came to me.. why not try to build a GREAT spaghetti sauce to go with some capellini? I dislike almost every single from the store Spaghetti sauce I have ever tried... too sweet.. Too much garlic.. Not enough of this... too much of that.. I thought.. I can't do any worse.. (well maybe) and I've got all day see what I can do. (Beats Netflix!) 

I stole from several recipes.. and came up with this:

Ingredients

  • 1 pound mild Italian sausage, sliced- I cut it up into chunks. To me, it should be part of the flavor, not a showcase.
  • 3/4 pound lean ground beef. I like organic from Smiths..
  • 1/2 cup minced onion
  • 2 cloves garlic, crushed. I like garlic, I crushed 3 smallish ones.( I should have used more)
  • 1 (28 ounce) can whole peeled tomatoes. Cut the tomatoes into bits.
  • 2 (6 ounce) cans tomato paste
  • 2 (6.5 ounce) cans tomato sauce
  • 1/2 cup Dubonnet wine (also good for Marsala sauce)
    (Factoid: Dubonnet was originally invented to get French Foreign
    Legion soldiers to take their quinine.)
    (use water if you don't cook with wine)
  • DO NOT add ANY Sugar. Dubonnet is a fortified wine.. And will make this sweet enough.
    If you use water, you may want to add a little bit. (2 teaspoons)
  • 1 1/2 teaspoons dried basil
  • 1/2 teaspoon fennel seed (makes for an authentic Italian flavor)
  • 1 teaspoon Italian seasoning
  • Salt to gusto. (I used just a pinch)
  • 1/4 teaspoon fresh ground black pepper.
  • Optionally, add about 1/2 lb fresh mushrooms. 
In your Volcano, use a 12" DEEP Dutch oven over medium heat, (I used 12 briquettes) cook the sausage, beef, onion, and garlic until well browned; drain fat. Stir in the tomatoes you cut into bits, tomato paste, tomato sauce, and water. Season with basil, fennel seed, Italian seasoning, salt, and pepper. Reduce heat to low, (take out 4 briquettes) cover, and simmer (close the vent ring ALL THE WAY after you take out the briquettes) 1 1/2 hours, stirring occasionally.  

Here are some tips on cooking pasta... The rest.. is up to you.

Cooking

Pasta should be cooked in rapidly boiling water. Add long pasta, like spaghetti, in a bunch, gradually pushing it down as it softens; add other types of pasta to the rapidly boiling water in a stream.

A brisk boil seals the pasta and is the best way to cook pasta al dente, meaning slightly firm to the bite. Use 1 tablespoon of salt in the water for each ½ kilogram of fresh or dried pasta. As it begins to soften, stir the pasta gently. For pasta to cook evenly without sticking together, it is important to use plenty of water and a pot that is large enough to allow for swelling (good-quality pasta will expand to 4 times its initial size). Use 12 cups of water per ½ kilogram of pasta, adding 4 cups of water for each additional ¼ kilogram of fresh or dried pasta. Too much water is better than too little when cooking pasta.

The required cooking time for pasta is partly a matter of taste and partly a matter of the size and quantity of pasta and of the hardness of the water. The best way to know when the pasta is al dente test it regularly during cooking. The initial moisture content of the pasta will also influence its cooking time:

  • Pasta made from hard wheat flour must be cooked longer than pasta made from soft wheat flour.
  • Fresh pasta cooks much faster than dried pasta.
  • Pasta that is to be cooked a second time or frozen should be cooked for a shorter time.
  • Drain pasta as soon as it is cooked or it will continue to cook and become too soft.
  • Rinse cooked pasta in cold water only if it is very starchy (in the case of soft wheat pasta, for example) to prevent it from sticking if it is to be used cold (as in a salad), or to halt the cooking process immediately (for example, in the case of pasta to be cooked a second time with other ingredients).
  • Some types of dried pasta intended for use in baked dishes (lasagne, manicotti and cannelloni) do not have to be precooked. However, these dishes usually require a greater quantity of liquid or sauce, as the pasta absorbs much of it as it cooks.
Enjoy - and Happy Valentines day. 

Thursday, February 3, 2011

Buy a Volcano Get a free Volcano Lid $149.00 plus shipping!

Buy a Volcano and get a free Lid. Offer good
while supplies last.
Use your Volcano for baking, and, in most cases,
no top heat needed..
Use less fuel. In some cases way less fuel.
$149.00 Plus shipping
(and sales tax if you live in Utah)

Wednesday, February 2, 2011

Since I am home with a Broken Arm and Bored to Death..

One of my favorite foods is Sushi.. is this related to the Volcano? No..at least not until I start doing tempura Sushi.. But if you were ever afraid of making sushi.. Because it was too hard.. It took too much time.. Blah blah blah.. Not true.
First.. I went out and looked at the traditional kits.. These consist of, basically, a spatula, a bamboo Sushi mat and some good luck wishes from the manufacturer.  I thought about several things, one of them being the mess that I would make in the kitchen and my untimely death if my wife saw it.. I thought there must be an easier way..
I went out on ebay (Where else?) and found this For about $20.00 shipping included. My kit did not include the chopsticks or the pasta looking fork.
So, I bought some Nori sheets (I wanted to make Maki Rolls)
Then I went to 1rst Oriental Market and bought some pickled ginger, 15 lbs of Sushi Rice ($23.00 for all of it) Note - Sushi Rice is a special SHORT GRAIN rice.. You CANNOT use long grain rice. It is NOT sticky and your rolls will fall apart.
This is the best kind of rice. The most important part of of making Sushi is the rice. You can put whatever you want in the roll.. but, the rice is the key.
I did not use a Rice Cooker.. I could have.. but this turned out well, so why bother?
1.5 cups of Dry rice + 2 cups of water. Put in a pan and bring to a boil. When it is at a boil, cover it and turn down to simmer for about 20 min.. until the rice is dry. It will be STICKY! (As in good luck scraping all of it off the bottom of the pan)
I used 4 cups of rice.. so I took 1/2 cup rice Vinegar, 1/2 cup of Splenda (you can use sugar if you don't like splenda and don't mind the calories) and 2 tbl of salt.
Take all of the rice out of your metal pan (you don't want a reaction with the Vinegar) and put it in a glass (or wood, if you're traditional) bowl and fold in the Vinegar mixture. This takes a little time because you don't want to smash  the rice.
Once it is mixed, I took the part of the mold to make round maki rolls and put in a Nori Sheet.
From here, fill about 1/2 way up with rice.. and then add whatever you want.. We used avocado, Smoked Salmon, Surimi and cukes. Once you have the filling in.. fill the rest up with Rice..
and use the supplied top/shaper (I used the round one and the heart one) and press down.
That's all there is to it. I wanted put them in the fridge.. However, I was out voted on letting them stay there overnight.. (So I could take pictures of the rolls) and, they were mostly devoured. However,
Here is what the finished product looked like: (Actual stuff I made)
I cannot believe how easy this way.. Next time, I will put two rows of something in the heart ones so that there is something on each side and I will add A LOT more "stuff"  and way less rice. Each roll, as I did them last night, took about 1 cup of UNCOOKED rice per each. (Can you say BIG maki rolls?) My next expedition (As soon as I can get out.. Will be to try this with some fresh caught Trout from an ice fishing escapade and, use the volcano so I can do Tempura.